【Unity】ECS框架学习笔记(二)
属性
[RequireMatchingQueriesForUpdate]
在Update中使用 Entities.WithAll<>(), Entities.WithAny<>(), Entities.ForEach() 等方法时,Unity 会自动生成一个 EntityQuery(IJobEntity也会创建)。系统通过这个 EntityQuery 去查找符合条件的实体。
该属性的作用是确保只有在系统的 EntityQuery 匹配了实际的实体数据时,系统才会执行update方法。
实用接口
1 | Entity entity = SystemAPI.GetSingletonEntity<PlayerTag>(); // 获取实体 |
注意事项
return与continue
虽然是一个很显而易见且简单的问题,但确实很容易被忽视
在遍历Query的时候如果想要跳过这一Entity的时候不要使用return,而是使用continue,例如该Entity数据为空,不需要处理
除非你不再需要遍历后面的其他的Entity,例如想要寻找某个Entity
1 | foreach (var damageBuffer in SystemAPI.Query<DynamicBuffer<DamageBufferElement>>()) |
相信在处理大多数Query的时候都是希望跳过这一个Entity,而不是跳过后续所有的Entity。所以在这里提醒自己注意一下这个问题
单例
保存单例的引用
如果确定整个场景只有确定个数的实体,并且数量也不会改变,那么可以直接在OnStartRunning直接获取到该实体并保存
该方法只适合SystemBase。如果想在Isystem的OnCreate中保存单例,后续使用该组件的时候会报错,提示引用丢失
1 | // 实验组——存储单例 |
1 | // 对照组——直接查找对象 |
以上两种方式的性能测试结果:
设置单例属性
在确定一个组件为单例时,可以使用SystemAPI.SetSingleton(IComponentData)保存该组件的值
- 该组件必须没有实现
IEnableableComponent或EntityQuery.SetSingleton{T}- 无法在
Entities.ForEach、IJobEntity、Utility methods或Aspects中使用
1 | var gamePropertyEntity = SystemAPI.GetSingletonEntity<GameStartProperties>(); |
监控数量
使用EntityQuery监控指定类型的数量
1 | public partial class PlayerSpawnerSystem : SystemBase |
或者
1 | public partial struct ClientRequestGameEntrySystem : ISystem |
ISystem的用法,需要使用.Dispose()手动释放资源
1 | var query = SystemAPI.QueryBuilder().WithAll<NewEnemyTag>().Build(); |
移除组件
v1.2.4貌似添加和删除组件都只能使用缓冲器
确认之后不会再使用的组件可以使用缓冲器移除
1 | var ecb = SystemAPI.GetSingleton<EndInitializationEntityCommandBufferSystem.Singleton>().CreateCommandBuffer(state.WorldUnmanaged); // 延迟到这一帧初始组结束时移除 |
1 | var ecb = new EntityCommandBuffer(Allocator.Temp); // 立即移除 |
创建实体
1 | var ecb = new EntityCommandBuffer(Allocator.Temp); |
销毁实体
SystemBase
1 | EntityManager.DestroyEntity(gamePlayingEntity); |
ISystem
1 | var ecb = new EntityCommandBuffer(Allocator.Temp); |
在其他方法中使用SystemAPI接口
1 | public void OnUpdate(ref SystemState state) |
一个组件烘焙多次
一个实体上只能拥有一个同名的组件,如果一个组件需要挂载多次,可以使用CreateAdditionalEntity创建一个额外的实体
1 | public Vector3[] TopLanePath; |
灵活使用关键字WithAny捕获
WithAny只要有一个符合就捕获
1 | // 捕获拥有碰撞物理,且有队伍的实体 // 既可以是英雄,也可以是小兵 |
事件
在GameObject中,事件是使用代码写Action来触发
但是在Entity中,事件的触发分为如下步骤
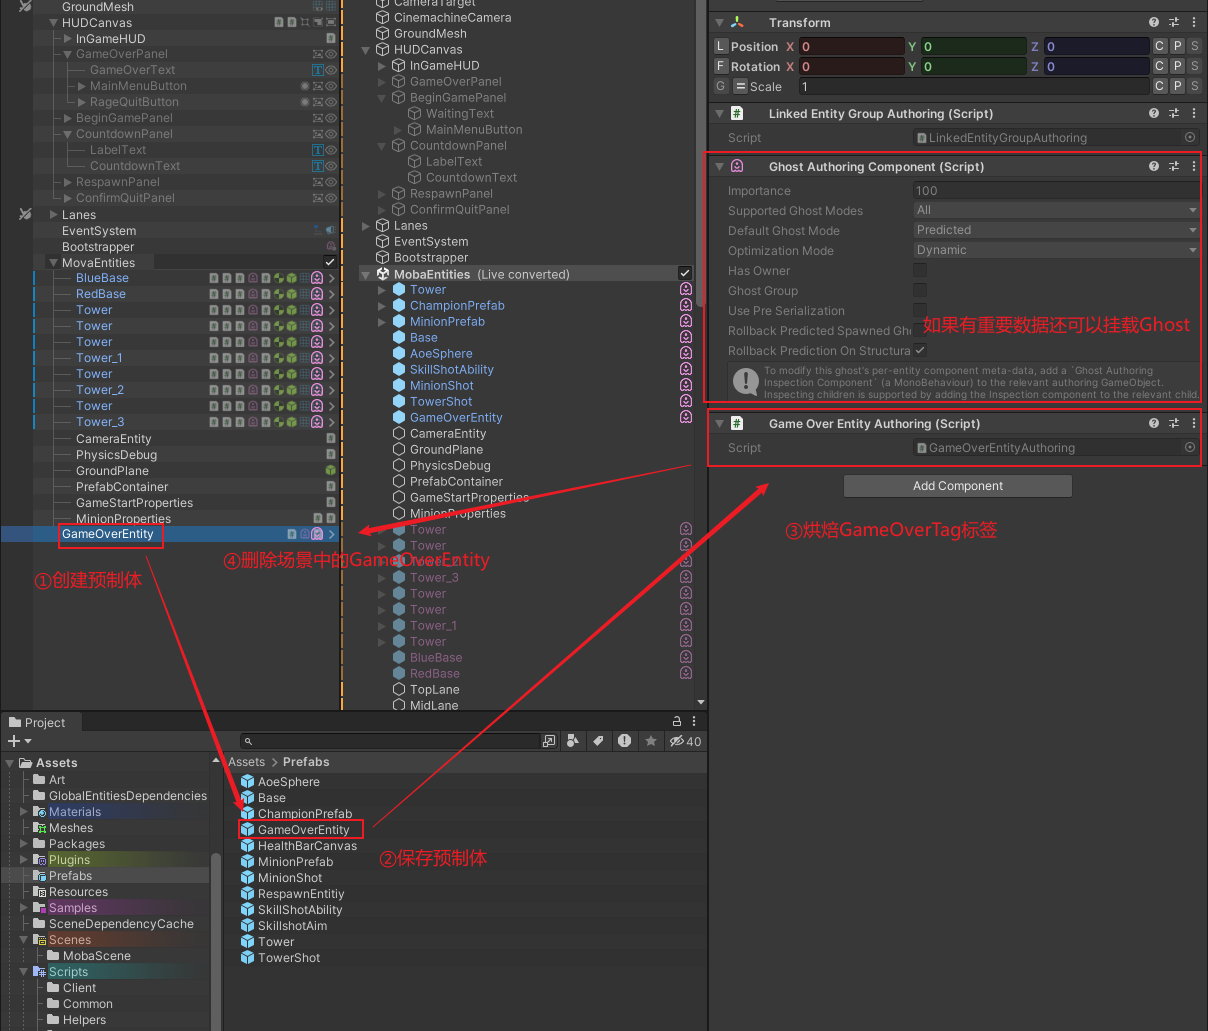
- 准备:
- 创建一个预制体,单独给这个预制体准备一个标签如
GameOverTag,并保存该对该预制体的引用。不能直接将该预制体放置在Entities场景中,而是存储其引用。 - 创建一个监听系统,如
GameOverSystem,一直捕获或者使用RequireForUpdate<GameOverTag>();执行逻辑
- 创建一个预制体,单独给这个预制体准备一个标签如
- 在你需要触发该事件的时候,比如在DestroySystem中检测到被摧毁的entity是基地,那么就将创建准备好的entity
GameOverSystem监听到场景中存在GameOverTag标签后,执行GameOverSystem逻辑
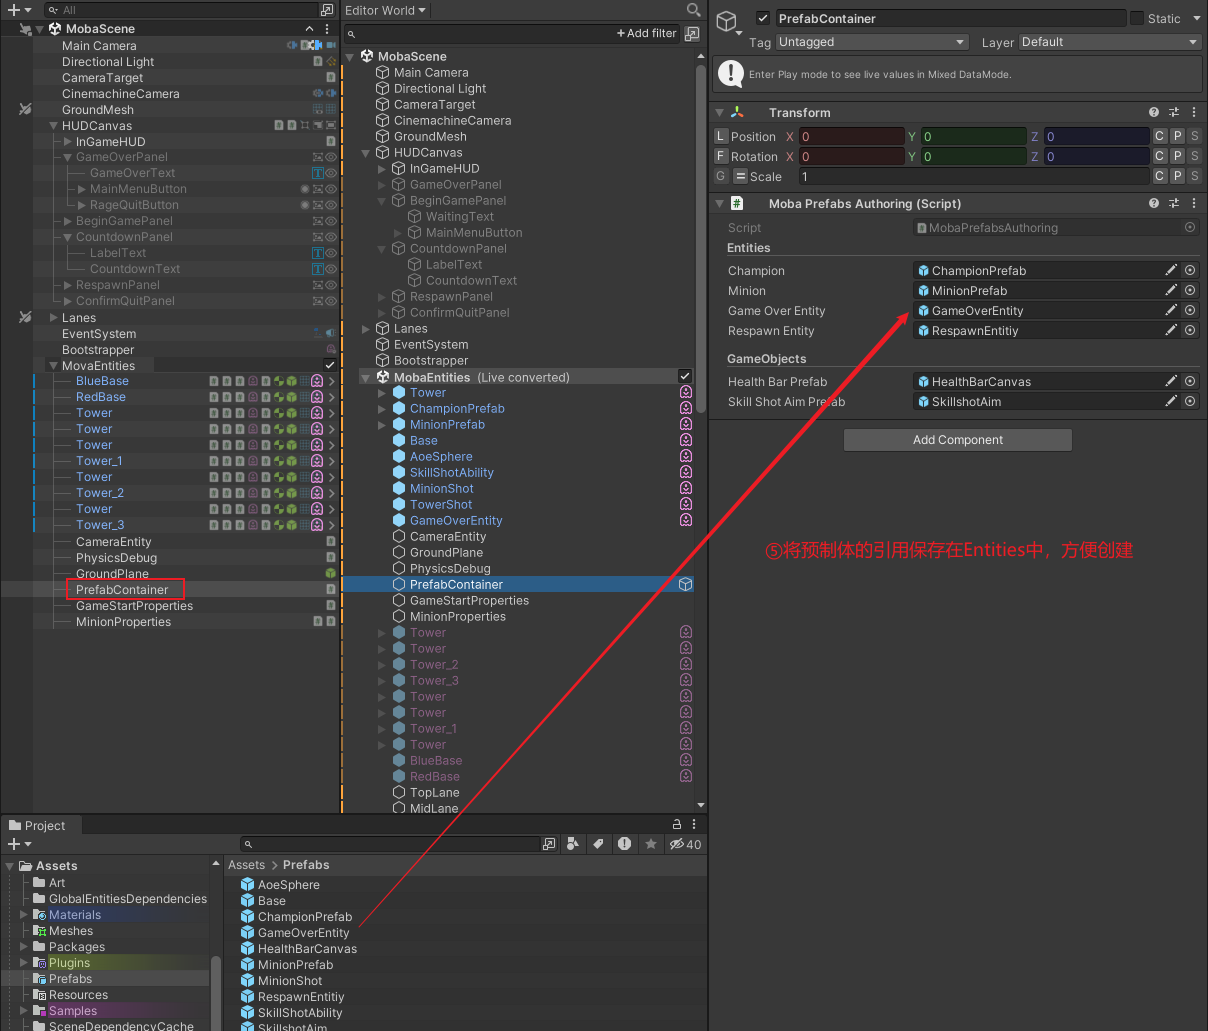
创建预制体详细流程:
与[Entities => GameObject](#Entities => GameObject)不同,我们需要创建的是Entity,所以我们要存储的是Entity类型
2
3
4
5
6
7
8
9
10
11
12
13
14
15
16
17
18
19
20
{
public Entity GameOverEntity; // 以Entity的形式保存下来
}
public class MobaPrefabsAuthoring : MonoBehaviour
{
public GameObject GameOverEntity; // 在Inspector窗口上引入预制体
private class Baker : Baker<MobaPrefabsAuthoring>
{
public override void Bake(MobaPrefabsAuthoring authoring)
{
var prefabContainerEntity = GetEntity(TransformUsageFlags.None);
AddComponent(prefabContainerEntity, new MobaPrefabs()
{ // 烘焙该Entity
GameOverEntity = GetEntity(authoring.GameOverEntity, TransformUsageFlags.None),
});
}
}
}
碰撞
球形射线
触发条件:
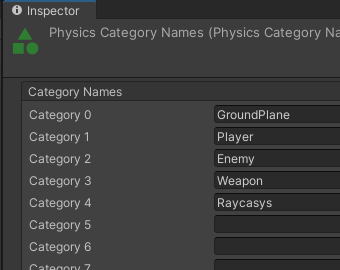
- 被检测的物体必须要有
Physics Shape组件 Physics Shape组件的Collision Filter的设置必须与射线设定的Collision Filter成对应关系
1 | CollisionFilter _collisionFilter = new CollisionFilter() |
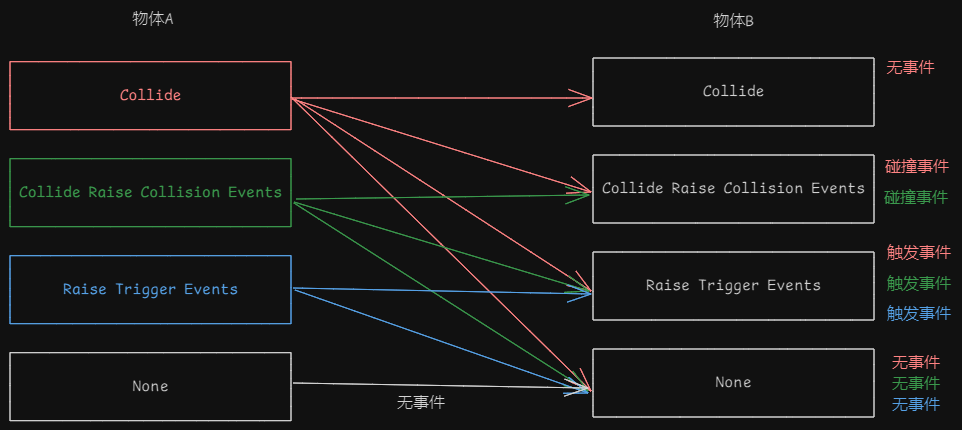
物理碰撞
两种触发方式:
ICollisionEventsJob:碰撞事件ITriggerEventsJob:触发事件,就可以理解成普通的包围盒勾选的Trigger
触发条件:
- (与射线一样)被检测的物体必须要有
Physics Shape组件 - (与射线一样)
Physics Shape组件的Collision Filter的设置必须与射线设定的Collision Filter成对应关系 - 碰撞的两个物体之中必须要有一个物体有
Rigidbody(必须是3D的,不支持2D的Rigidbody) - 最后一项也是最重要的一项,必须设置
Collision Response,两个物体分别选择什么会触发哪个事件也标明在图二了

1 | [] // 必须 |
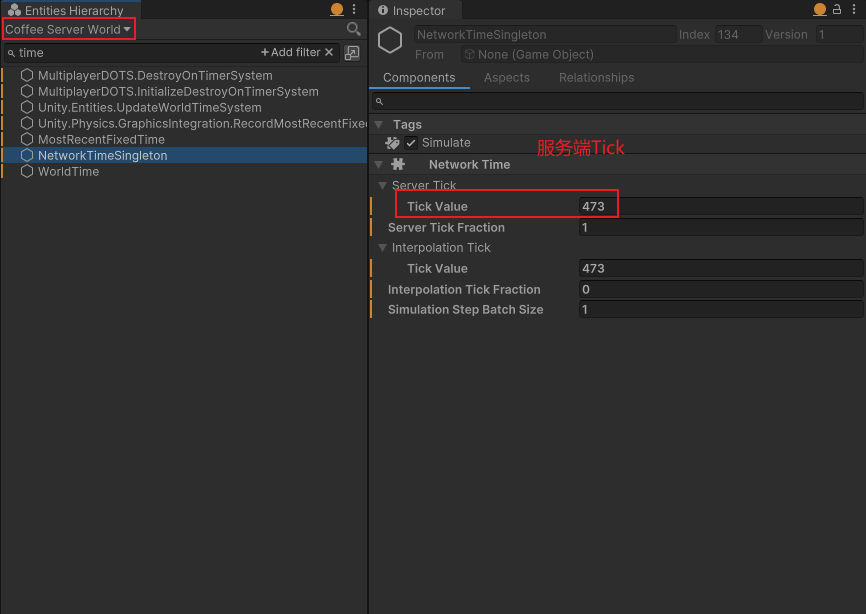
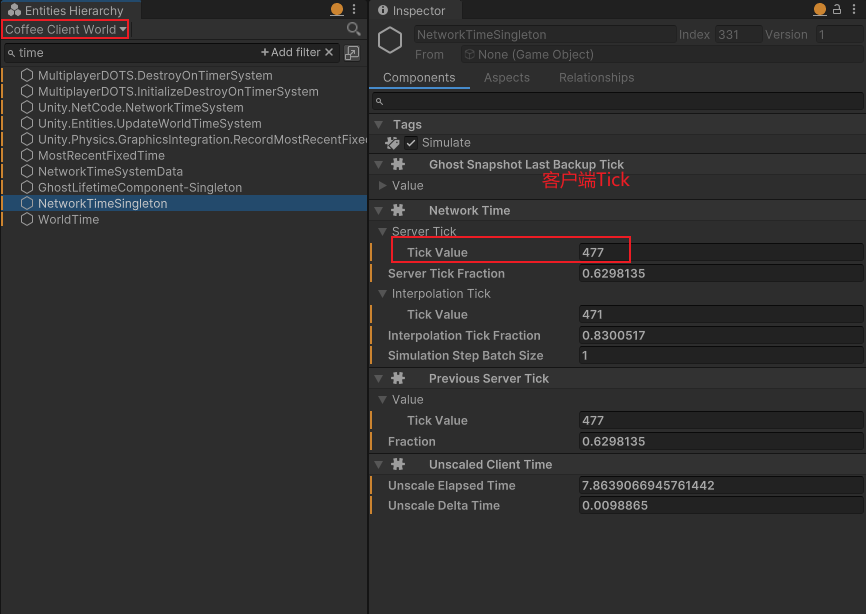
关于Tick和IsFirstTimeFullyPredictingTick
Tick是固定一秒60次,并不是update执行的次数。由于服务器没反应过来,服务器update的次数一般都会比Tick次数少,客户端反应比较快一半会比60大。
服务端会将数据以Tick的频率发送给客户端,而客户端会平滑的设置其数值,有如下两种情景
数值:服务端告诉客户端第20Tick
Value = 10,那么客户端在19Tick(假设Value=0)与20Tick之间会多次执行update,让Value从0平滑的到达10。假如客户端一个Tick可以运行10次,那么value第一次update为0,第二次update为1,第三次update为3….直到完整的到达第20Tick,Value就等于10了。事件:服务端告诉客户端第20Tick的时候创建一个小兵,那么在19Tick与20Tick之间,每次update都会创建一个小兵
这时就需要用到
IsFirstTimeFullyPredictingTick了,在19到20Tick之间updateIsFirstTimeFullyPredictingTick返回false;当你真正达到20Tick,IsFirstTimeFullyPredictingTick返回True,表示这是第一次完整的预测Tick
假设有代码如下:
1
2
3
4
5
6
7
8
9// [UpdateInGroup(typeof(PredictedSimulationSystemGroup))] system在模拟组中
var networkTime = SystemAPI.GetSingleton<NetworkTime>();
if (networkTime.IsFirstTimeFullyPredictingTick)
{
ecb.生成小兵(); // 只有在20Tick的时候才会执行
}
Value = 10; // 在18到20Tick之间,客户端每次update都将让Value更接近10
// 虽然这里写的是直接赋值,但客户端并不会生硬的将Value设置为10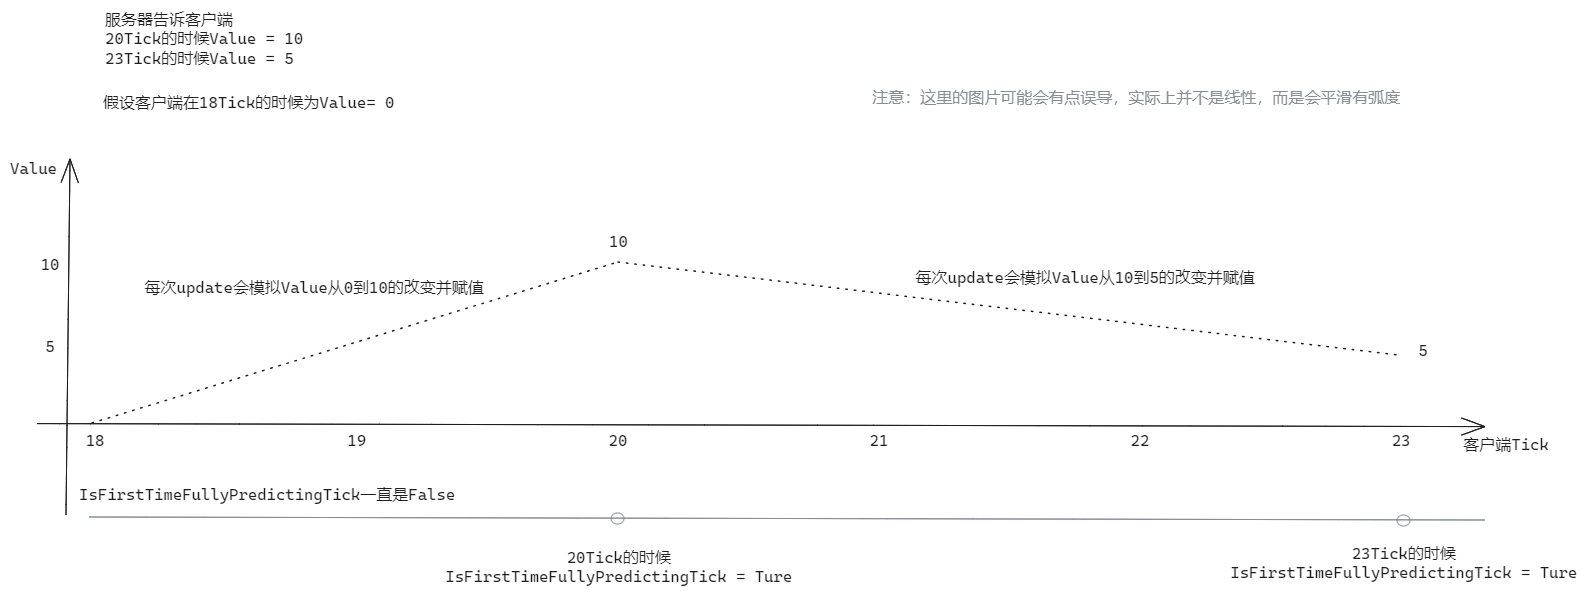
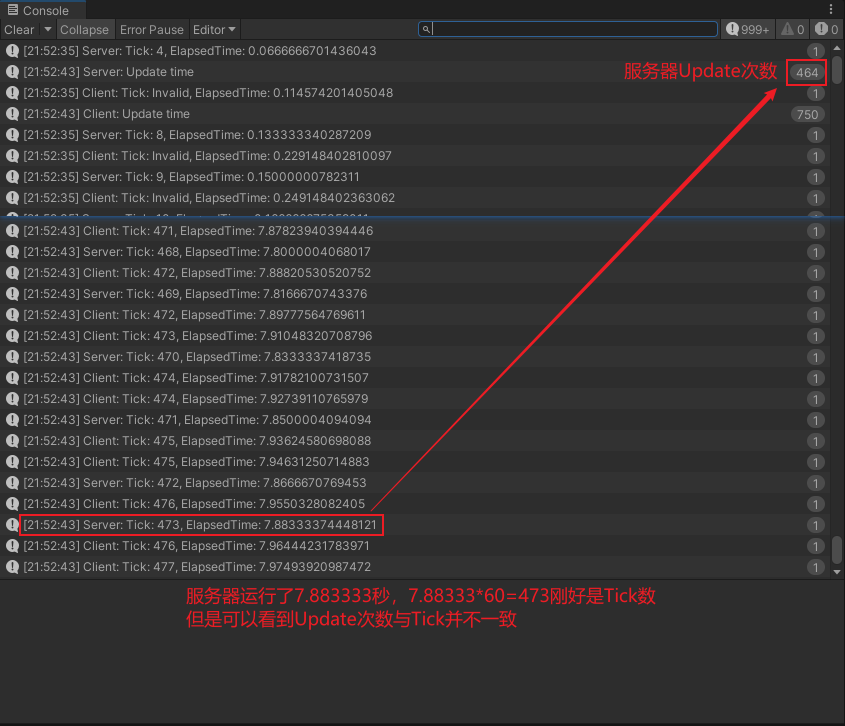
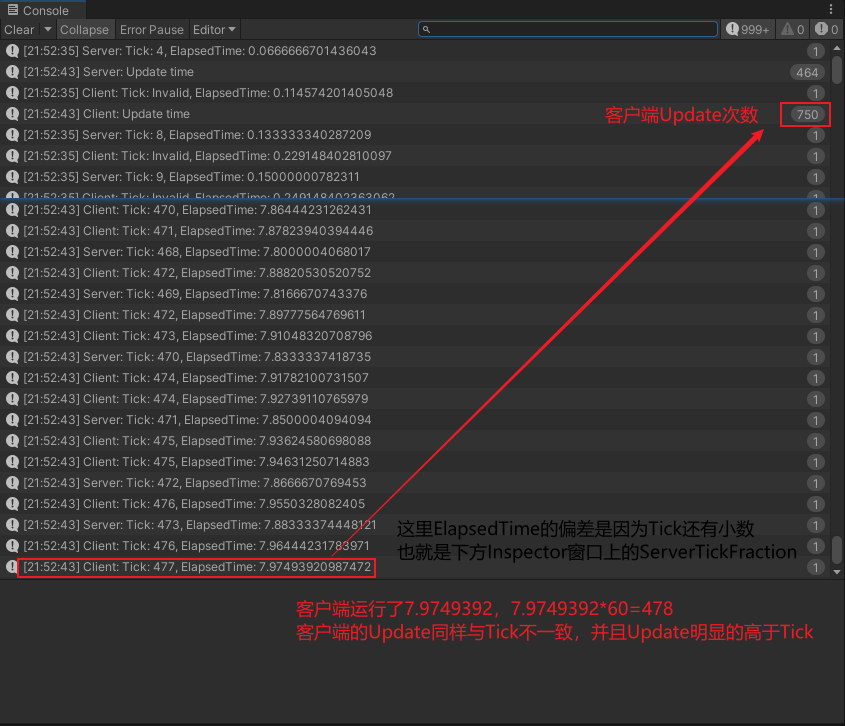
服务端与客户端的Tick并不同步。这应该就是延迟的由来?
测试代码:
1 | public partial struct TestSystem : ISystem |
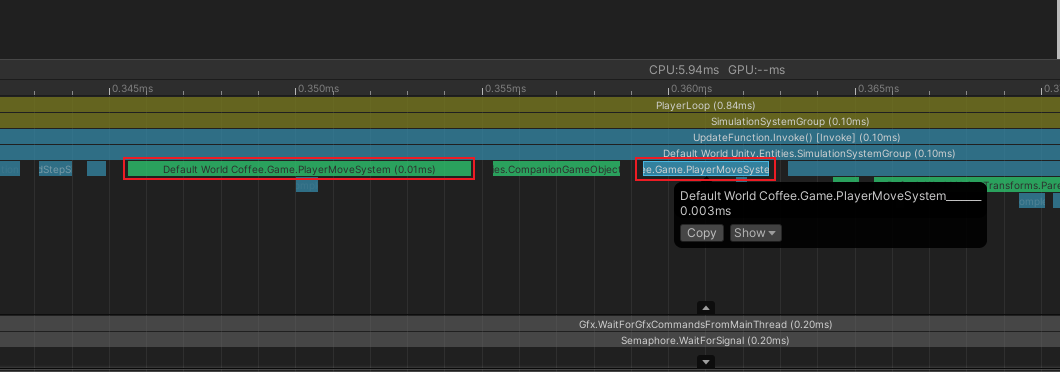
GameObject与Entities世界交互
GameObject => Entities
系统:
1 | // 判断Default World中 PlayerMoveSystem 系统是否存在 |
实体:
1 | // 创建实体 |
1 | // 捕获EntityQuery |
1 | _entityManager = World.DefaultGameObjectInjectionWorld.EntityManager; |
如果使用了NetCode包,在创建Client World时,需要将Default World设置为Cilient World
2
3
4
var clientWorld = ClientServerBootstrap.CreateClientWorld("Coffee Client World");
// 将Default World 设置为 Cilient World
World.DefaultGameObjectInjectionWorld = clientWorld;
Entities => GameObject
方法一:单例,比较简单,就不说了
方法二:创建GameObject时保存对其的引用,方法如下
1 | public class HealthBarUIReference : ICleanupComponentData // 注意这里使用的是class而不是结构体 |
由于烘焙的时候只能挂载预制体,所以entities无法直接引用到GameObject中的物体
BlobArray<T>
特点:
- 允许存储大量数据,并且只读
- 存储在一块连续的内存区域,访问速度快,缓存友好
- 由于是只读的,所以可以在多个线程中安全地共享和访问
使用方法:
定义
BlobArray和BlobAsset1
2
3
4
5
6
7
8
9public struct SpawnEnemyPoint : IComponentData
{
public BlobAssetReference<SpawnEnemyPointBlob> Value;
}
public struct SpawnEnemyPointBlob
{
public BlobArray<float3> Value;
}将
SpawnEnemyPoint烘焙到任意实体上使用
BlobBuilder赋值1
2
3
4
5
6
7
8
9
10
11
12
13
14
15
16
17// 初始化一个临时用的builder
using (BlobBuilder builder = new BlobBuilder(Allocator.Temp))
{
// 确定需要存储的Blob结构体数据类型
ref SpawnEnemyPointBlob pointBlob = ref builder.ConstructRoot<SpawnEnemyPointBlob>();
// 分配大小空间
BlobBuilderArray<float3> arrayBuilder = builder.Allocate(ref pointBlob.Value, 10);
// 填充数据
for (int i = 0; i < 10; i++)
{
arrayBuilder[i] = new float3{i, 0f, 0f};
}
// 创建Blob的引用(类似于指针?)
BlobAssetReference<SpawnEnemyPointBlob> blobAsset = builder.CreateBlobAssetReference<SpawnEnemyPointBlob>(Allocator.Persistent);
// 将创建的引用赋值给gameEntity的组件上,供其使用
ecb.SetComponent(gameEntity, new SpawnEnemyPoint(){Value = blobAsset});
}使用方法与列表一样
1
2private readonly RefRO<SpawnEnemyPoint> _spawnEnemyPoint;
var position = _spawnEnemyPoint.ValueRO.Value.Value.Value[0];
为什么不直接将
BlobArray当做IComponentData挂载到实体上?
- 将
BlobArray直接放在实体上,每个实体都会有独立的BlobArray副本,大大增加了内存使用BlobAssetReference存储的是指向连续内存块的指针
多个实体可以共享一个BlobArray,而不需要为每个实体分配内存IComponentData是可更改的,每次修改组件都可能会导致内存重新分配和复制,对于不可变数据来说不必要
System报错
InvalidOperationException: The previously scheduled 'IJobEntity' writes to the ComponentTypeHandle<Unity.Collections.NativeText.ReadOnly>
1 | InvalidOperationException: The previously scheduled job <AJob> writes to the ComponentTypeHandle<Unity.Collections.NativeText.ReadOnly> <AJob>.<Value>. |
- 两个任务共同访问了同一个
IComponentData
原因
两个System.IJobEntity的IAspect中以读写的方式定义了同一个实体的组件数据
如生成敌人系统和敌人移动系统,在Systems窗口中可以看到两个系统的执行先后
根本原因:
- 没有定义系统之间执行顺序
Run()执行完后再才进入下一个system,并且在执行期间会保护数据,其他系统只能读取无法修改Run()所访问的读写组件
错误代码
生成敌人错误代码:
1 | public partial struct SpawnEnemySystem : ISystem |
1 | public readonly partial struct TestAspect : IAspect |
移动系统错误代码:
1 | public partial struct EnemyMoveSystem : ISystem |
1 | public readonly partial struct EnemyMoveAspect : IAspect |
从上面的代码可以看出,仅仅只是引用就会报错
这里生成和移动敌人例子可能不太合理,但只要理解到两个系统的
IAspect以读写的方法定义了同一个的实体的同一个组件就OK了注意:为了节约空间简化了不少代码
解决方法
方法一:
使用UpdateAfer属性定义执行顺序
1 | [] |
这样,在成功生成敌人后,在执行移动系统,移动系统就不会在敌人还在生成的时候就修改其组件
方法二:
将选择其中Entity较少的任务设置依赖项,并等待其编译完成
1 | public partial struct EnemyMoveSystem : ISystem |
方法三:
使用Query获取Aspect
1 | public partial struct EnemyMoveSystem : ISystem |
InvalidOperationException: 'EntityCommandBuffer' is not declared [ReadOnly] in a IJobParallelFor job. The container does not support parallel writing. Please use a more suitable container type.
原因
该容器不支持并行写入
错误代码
1 | public partial struct EnemyMoveSystem : ISystem |
解决方法
修改类型成可并行写入的缓冲器容器
1 | var ecb = SystemAPI.GetSingleton<EndSimulationEntityCommandBufferSystem.Singleton>().CreateCommandBuffer(state.WorldUnmanaged).AsParallelWriter(); |
1 | private void Execute(EnemyMoveAspect enemy, [ChunkIndexInQuery]int sortKey) // 并不是普通的int类型,需要指定类型 |
使用方法:需要指定执行的顺序,如果没有特殊的顺序需要考虑,可以使用ChunkIndexInQuery
ChunkIndexInQuery:在ECS中,
EntityQuery会返回多个 “chunk”(即实体的内存块),而每个 “chunk” 存储一组符合查询条件的实体ChunkIndexInQuery就是这些chunk在整个查询中的唯一索引值。每个
chunk在查询的范围内都有一个唯一的索引值,避免多个chunk之间产生混淆。即使调度方式发生变化(例如工作在多个线程之间并行执行),这个索引值也保持不变,保证了在不同的调度执行顺序下,
ChunkIndexInQuery始终一致。因为索引值是确定且稳定的,所以在使用
EntityCommandBuffer(ECB)时,可以保证对实体的操作是可预测和一致的(例如,记录、重放命令时不受并行或调度的影响)。
'MultiplayerDOTS.NpcAttackSystem' creates a Lookup object (e.g. ComponentLookup) during OnUpdate. Please create this object in OnCreate instead and use type _MyLookup.Update(ref systemState); in OnUpdate to keep it up to date instead. This is significantly faster.
原因
在使用了错误的API
错误代码
1 | state.Dependency = new NpcAttackJob() |
解决方法
1 | state.Dependency = new NpcAttackJob() |