【Unity】ECS框架学习笔记(一)——初识
安装
创建一个Unity项目
包体
使用Add the package by its name添加以下模块
com.unity.entities:包本体com.unity.entities.graphics:可使用脚本渲染管道(SRP)渲染实体com.unity.physics:实体的状态和物理系统,还需要下载Samples中的Custom Physics Authoring
可选:
com.unity.netcode:网络,多人游戏使用
环境
需要注意的是,IDE只能使用以下两种
- Visual Studio 2022+
- Rider 2021.3.3+
版本
- Entities:1.2.4
- Entities Graphics:1.2.4
- Unity Physics:1.2.4
注意事项
IComponentData
- 由于ECS中的C是结构体,在引用其内部数据的时候要注意引用的是其本体还是复制副本(经过学习后发现如果使用的方法正确,基本上不会碰到这个问题,Unity已经帮我们封装好了)
- System绑定的依赖是
IComponentData而不是Entity - Aspect绑定的才是
Entity
Build
在build之前,执行以下操作确保Build成功
- 关闭Entity子场景,这样在editor中将优先加载子场景。运行游戏时可能会遇到报错,例如在
OnCreate()和OnUpdate()中获取单例就会报错- 原因:游戏在第一帧时子场景还没有加载完,所以单例不存在
- 解决方法:在
OnCreate()中添加RequireForUpdate<T> - 如果不希望每帧都调用单例,可以在
OnStartRunning()中调用单例,这方法只适用SystemBase,因为ISystem没有该方法(除了单例,如果是确定个数的实体也适用该方法)
- Resolve Loading Entity Scene Failed errors,解决加载Entity Scene失败错误
- 貌似是Unity的Bug
- 可以重启Unity Editor,清除实体缓存。Edit-Preferences-Entities-ClearEntityCache
- 保存主场景和子场景
放在Entities中的子场景可以不用放在
Scenes In Builde中
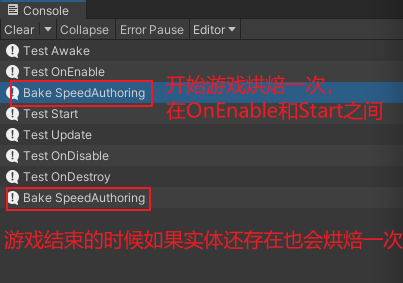
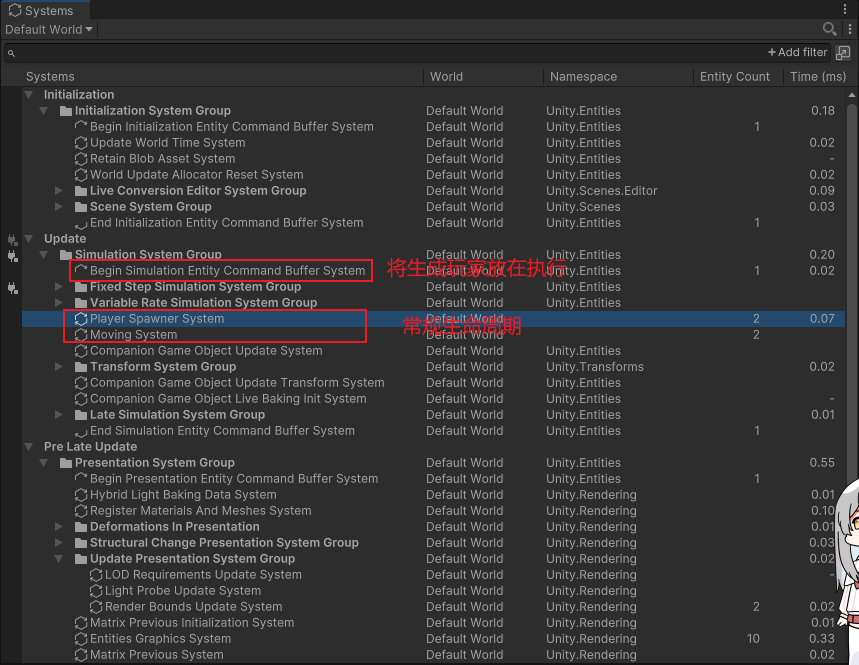
System的生命周期
一般情况下可以查看Systems窗口查看执行顺序,但如果使用了缓冲器就得注意顺序了
1 | var ecb = SystemAPI.GetSingleton<EndInitializationEntityCommandBufferSystem.Singleton>().CreateCommandBuffer(state.WorldUnmanaged); // 在初始化组结束的时候执行 |
1 | var ecb = new EntityCommandBuffer(Allocator.Temp); |
示例:控制角色移动
场景搭建
创建子场景
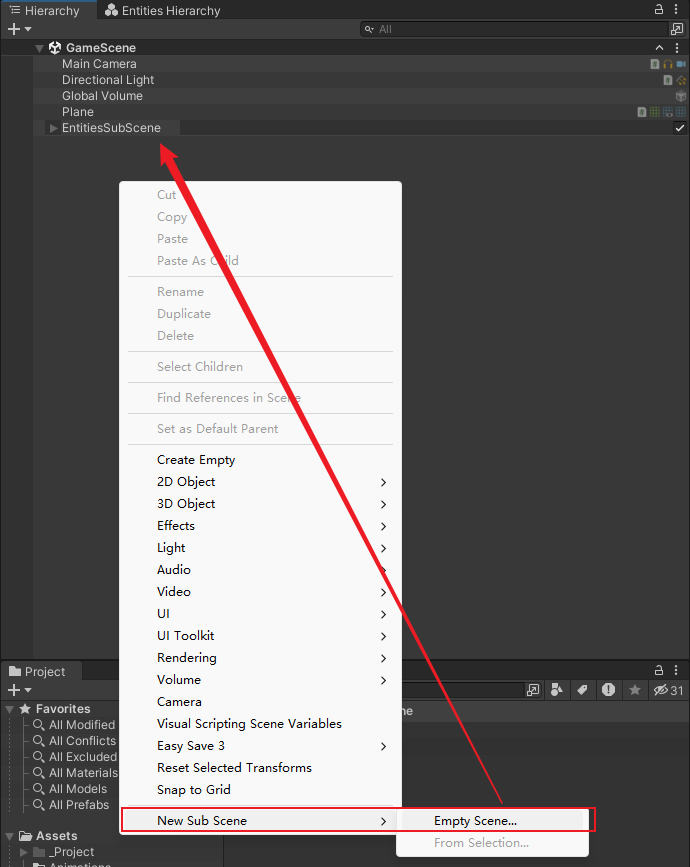
创建Entities对象
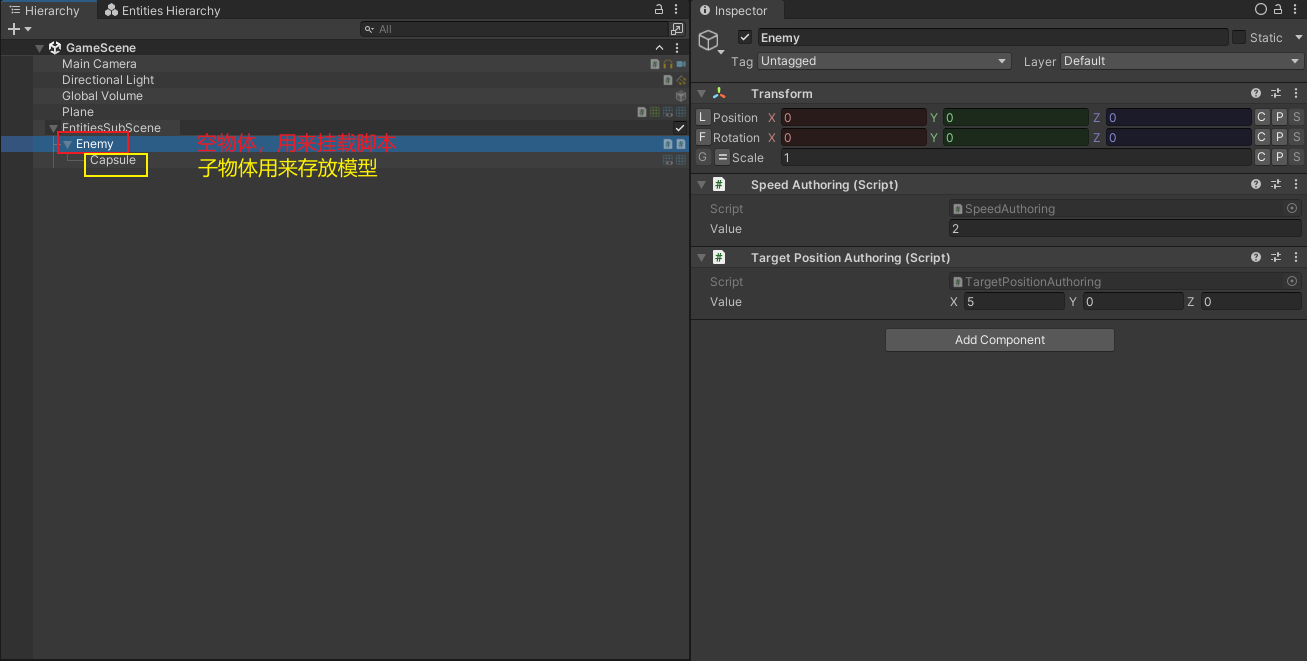
脚本
Component脚本:存放数据
1
2
3
4public struct Speed : IComponentData // 存储角色移动速度
{
public float value;
}1
2
3
4public struct TargetPosition : IComponentData // 存储目标位置
{
public float3 value;
}Entities脚本:挂载到Entities上,将数据传递给Entities
1
2
3
4
5
6
7
8
9
10
11
12
13
14
15
16
17
18public class SpeedAuthoring : MonoBehaviour
{
public float value;
public class SpeedBaker : Baker<SpeedAuthoring>
{
// Debug.Log("Bake SpeedAuthoring");
public override void Bake(SpeedAuthoring authoring)
{
var entity = GetEntity(TransformUsageFlags.Dynamic);
var data = new Speed
{
value = authoring.value
};
AddComponent(entity, data);
}
}
}1
2
3
4
5
6
7
8
9
10
11
12
13
14
15
16
17public class TargetPositionAuthoring : MonoBehaviour
{
public float3 value;
public class Baker : Baker<TargetPositionAuthoring>
{
public override void Bake(TargetPositionAuthoring authoring)
{
var entity = GetEntity(TransformUsageFlags.Dynamic);
var data = new TargetPosition
{
value = authoring.value
};
AddComponent(entity, data);
}
}
}注意一下烘焙时机,虽然可能不会用到
System脚本:执行游戏逻辑
1
2
3
4
5
6
7
8
9
10
11public partial class MovingSystemBase : SystemBase
{
protected override void OnUpdate()
{
foreach (var (localTransform, speed, targetPosition) in SystemAPI.Query<RefRW<LocalTransform>, RefRW<Speed>, RefRW<TargetPosition>>())
{
var direction = math.normalize(targetPosition.ValueRW.value - localTransform.ValueRW.Position);
localTransform.ValueRW.Position += direction * SystemAPI.Time.DeltaTime * speed.ValueRO.value;
}
}
}
窗口介绍
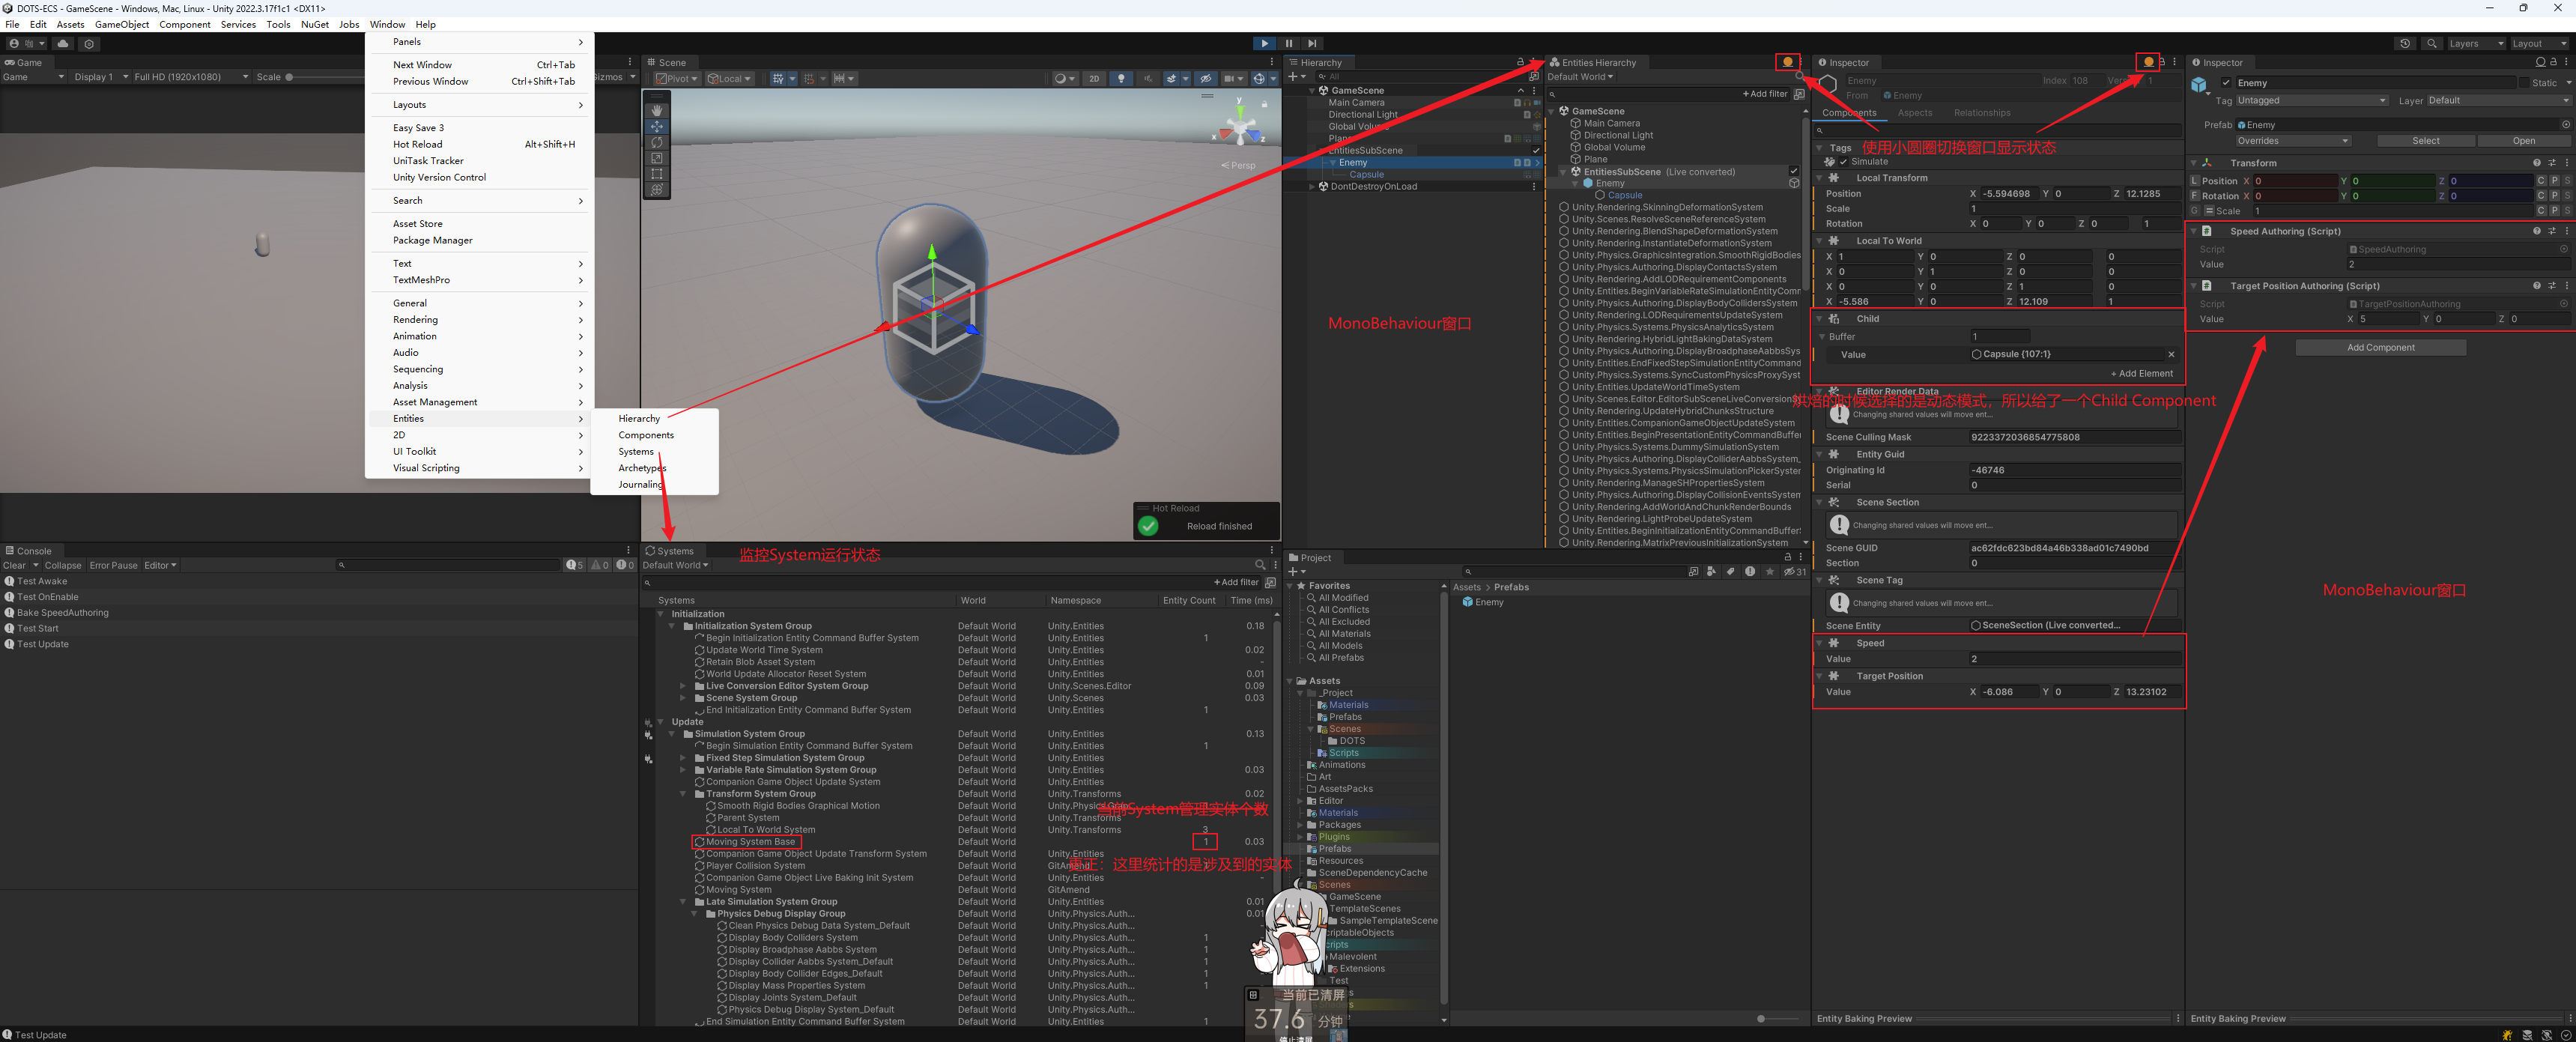
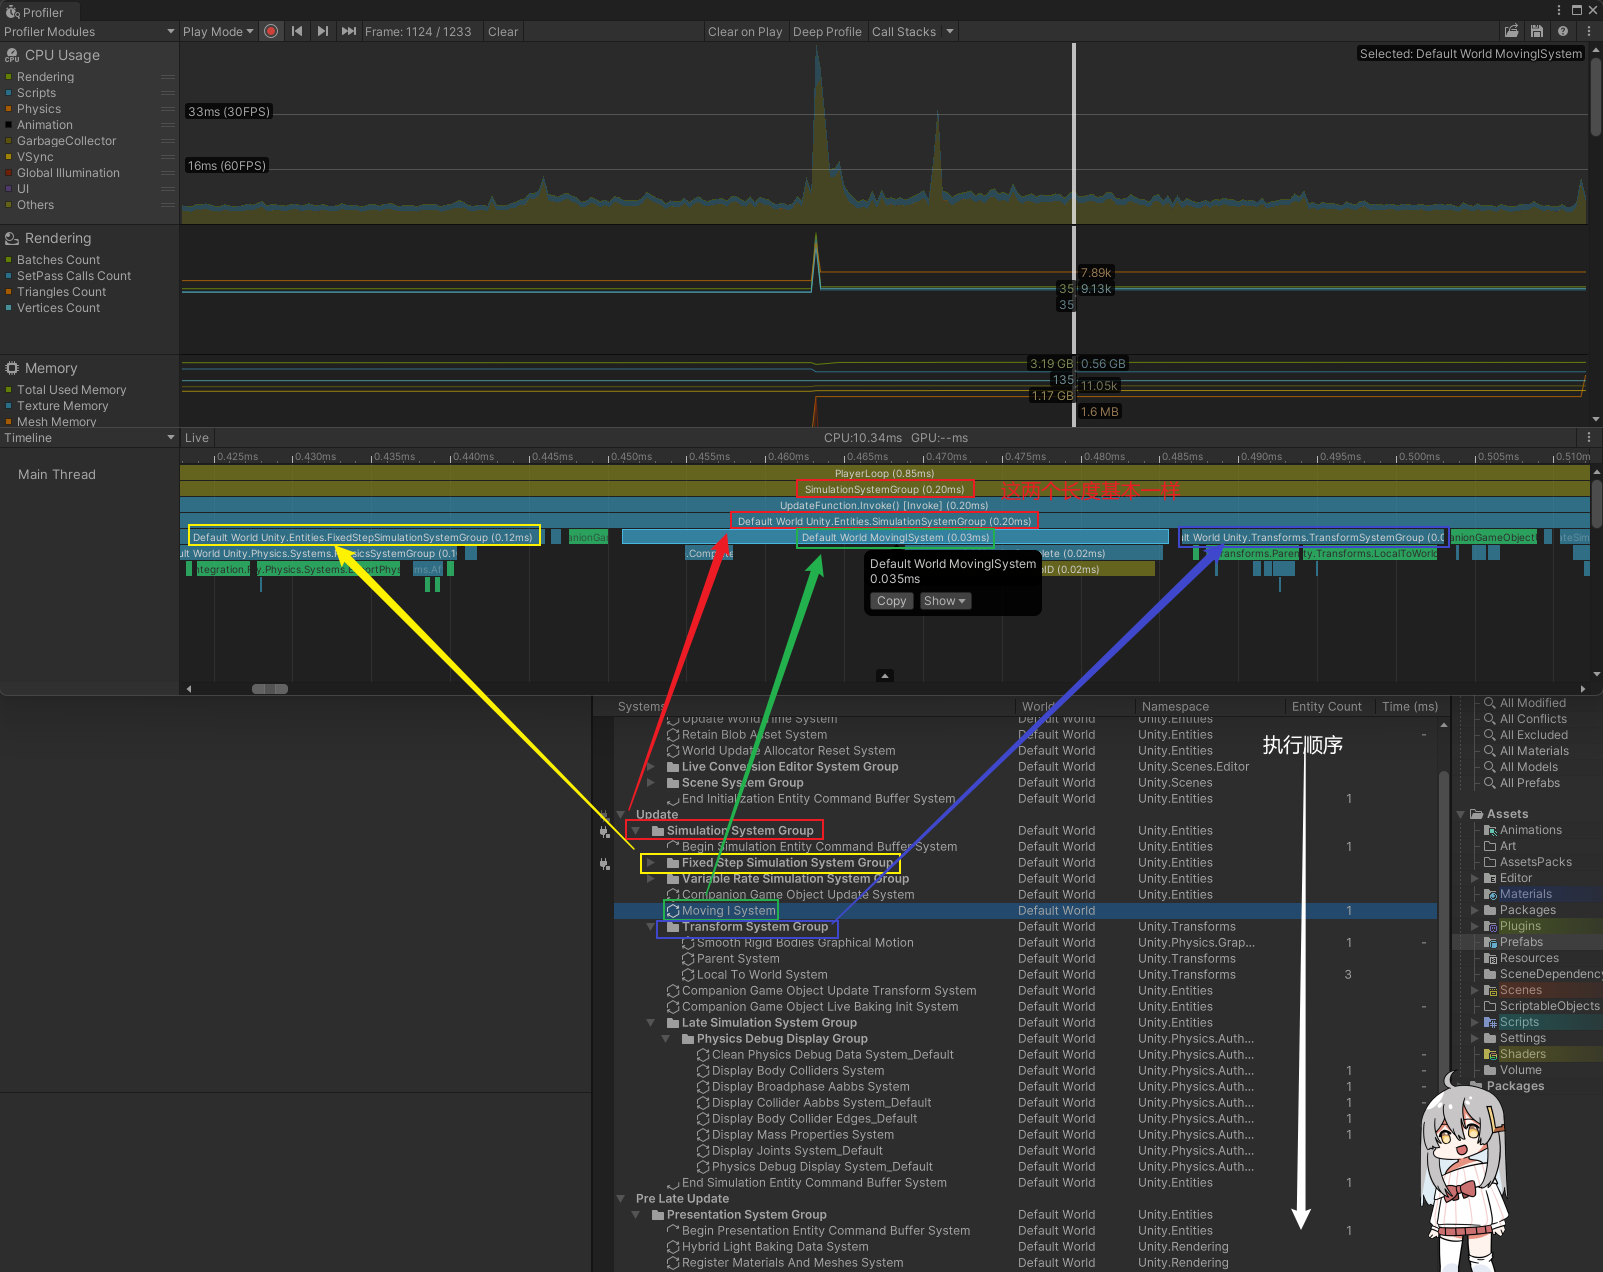
Systems
Entity Count:该system涉及到的实体,如:
符合
ISystem.IJobEntity.Execute()参数IComponentData或IAspect条件的实体在该system中使用过该实体的方法,如
1
2var entityCommandBuffer = SystemAPI.GetSingleton<BeginSimulationEntityCommandBufferSystem.Singleton>()
.CreateCommandBuffer(World.Unmanaged);
System
IAspect
上面的System脚本是否看起来十分臃肿,可以使用IAspect将下达命令的System与执行逻辑分开。
除了能解耦执行逻辑外,还可以很清楚区分开该实体是否需要处理此执行逻辑。如下面的MoveToPositionAspect使用了LocalTransform、Speed和TargetPosition三个标签Component,那么所有拥有这三个的实体就执行此逻辑,少了任何一个都无法执行
IAspect同样是结构体,在使用时需要注意值类型和引用类型的问题
IAspect的Component字段只能是RefRW、RefRO、EnabledRefRW、EnabledRefRO、DynamicBuffer或Entity。Ref正如关键字ref一样,直接引用其地址,而不是复制,这样就能避免值类型和引用类型的问题可以将
IAspect看做是特殊的IComponentData,所有拥有其定义的Ref字段的实体就拥有该IAspect
1 | public readonly partial struct MoveToPositionAspect : IAspect |
将上面的MovingSystemBase修改为:
1 | public partial class MovingSystemBase : SystemBase |
需要注意的是,
SystemAPI只能在System中使用,所以只能将DeltaTime当做参数传递过去
ISystem
除了上面的SystemBase外还可以使用ISystem实现,ISystem更加轻量
因为是结构体,所以速度更快,但是和Component同样在使用时需要注意值类型和引用类型的问题
1 | public partial struct MovingSystem : ISystem |
- 实体很多就使用ISystem
- 不用在性能表现就使用SystemBase
IJobEntity异步Burst编译
将逻辑放在其他线程上,不阻塞主线程,引入IJobEntity的结构体
1 | [] |
线程ID
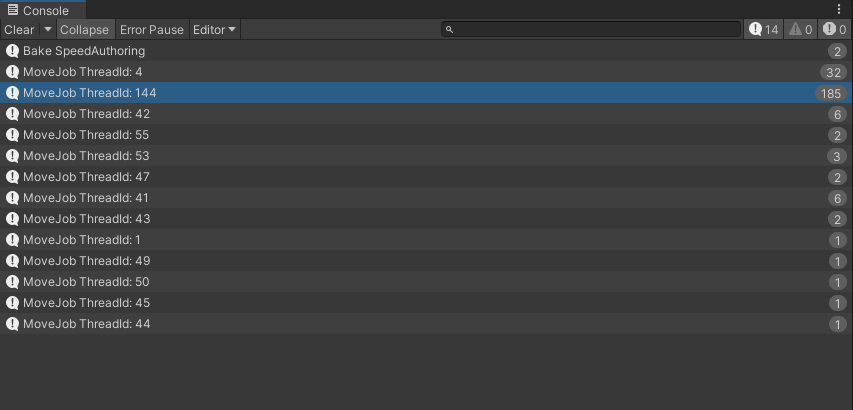
按照上面的代码运行了很多次,都是在4线程,说明ScheduleParallel并不是随机分配线程ID
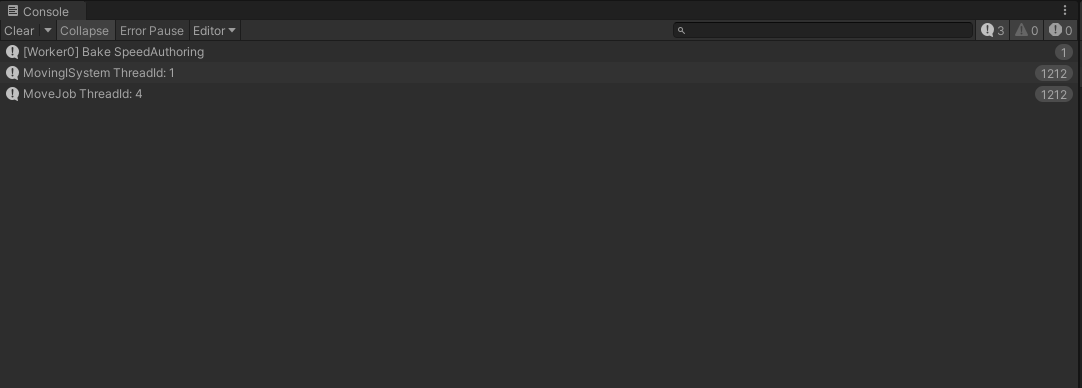
但是也有一个奇怪的现象,如果注释掉主线程的Debug.Log(),MoveJob ThreadId不止为4
原因应该与UnityEngine方法只能在主线程上执行有关,Debug.Log()为UnityEngine(Unity可能对该方法做了特殊处理,所以可以在其他线程上运行,但是输出的内容就不能考究了,尤其是涉及了线程)
并且线程ID并不重要,所以就不深究了
调度方法
IJobEntity.Run():立即在当前线程上执行,完成后再进入下一个System,并不一定是在主线程
IJobEntity.Schedule():单线程调度。将job调度到一个工作线程上,但不是并行的。所有符合查询条件的实体会按照顺序在同一个线程上依次处理。线程安全不用担心数据竞争或冲突,适合不需要复杂的并行计算,或者实体数量较少时使用。
IJobEntity.ScheduleParallel():并行调度。将job调度为并行执行的任务。会拆分为多个批次,并在不同的线程上处理这些批次。实体较多时可显著提高性能,但可能会引发数据竞争或冲突
当实体数量较多,并且每个实体的处理相对独立(没有数据竞争)时,
ScheduleParallel能显著提高性能但如果任务较小或无法保证线程安全,则可以使用
Schedule。使用
job.Complete()后,主线程将被阻塞,直到该作业完成
[BurstCompile]属性:
优点:
- 将代码编译为高度优化的本地机器代码(如 x86 或 ARM 架构)。与标准的 C# IL 代码相比,生成的机器代码能更有效地利用 CPU,减少不必要的性能开销。
- Burst 编译器会尝试将代码自动矢量化,可以利用CPU指令集来同时处理多个数据
- Burst 编译器生成的代码与 C# 的托管环境隔离得更彻底,减少了垃圾回收的负担
缺点:
调试会变得更困难,因为编译后的代码不容易映射回原始 C# 代码。可以使用Burst Inspector 来分析生成的代码
Burst 编译器不支持一些高级 C# 特性,如虚函数、多态、异常处理等
以下为碰到的不支持的语法,有些语法编译会提示Burst不支持,但是用起来却没有问题,是因为其退回到了普通的.NET托管代码模式了
1
2
3
4
5
6System.DateTime; // 虽然用起来没啥问题,但是在编译后unity会报错,提示不支持
System.Environment.Tick; // 提示找不到该方法
System.Diagnostics.Stopwatch.GetTimestamp(); // 同上
System.Environment.NewLine; // 编译提示不支持
System.Guid.NewGuid().ToByteArray(); // 编译提示不支持
... // 不列了,基本上System都会不支持System.DateTime:- 报错内容:
(0,0): Burst error BC1045: StructSystem.DateTimewith auto layout is not supported - 本质:
BurstCompile不支持带有自动内存布局的结构体,例如System.DateTime。这意味着Burst不能处理其内存布局,因为它可能在不同平台上表现不同。
- 报错内容:
System.Guid.ToByteArray()- 报错内容:
Assets\Scripts\Malevolent\DotsHelpers.cs(25,46): Burst error BC1016: The managed function System.Guid.ToByteArray(System.Guid* this) is not supported - 本质:由于调用了不支持的托管方法,
Burst无法编译与托管代码相关的 API,比如System.Guid的方法。
- 报错内容:
- 只用ISystem使用Burst编译
- 使用
[BurstCompile]后在Profiler中可以观察到IJobEntity- 可以使用Job-Burst-OpenInspector窗口查看编译错误
控制执行生命周期
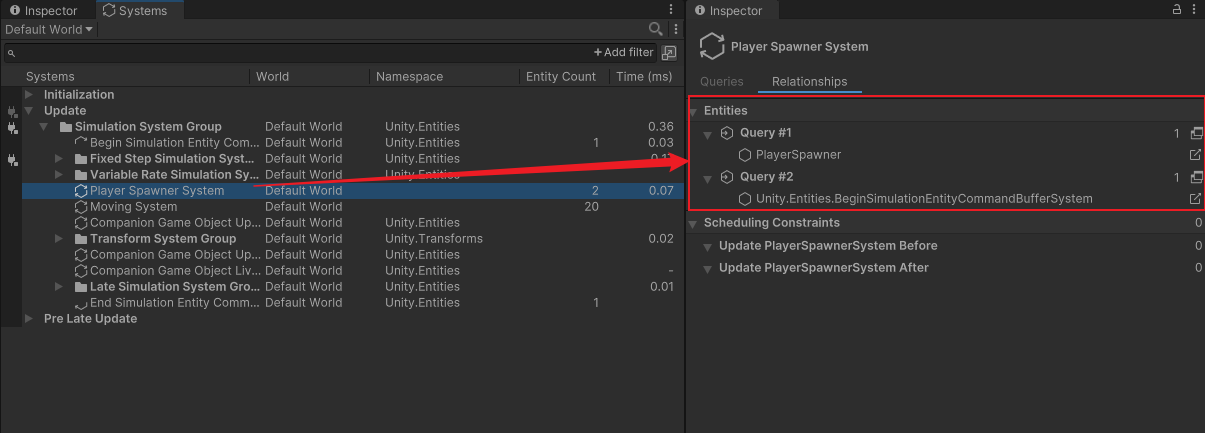
1 | public partial class PlayerSpawnerSystem : SystemBase |
Profiler
可以根据System窗口的顺序查找
场景互通
GameObject获取Entities场景中的实体
1 | using Unity.Entities; |
性能测试
既然使用了ECS,那当然少不了喜闻乐见的性能测试了,生成20000个Player
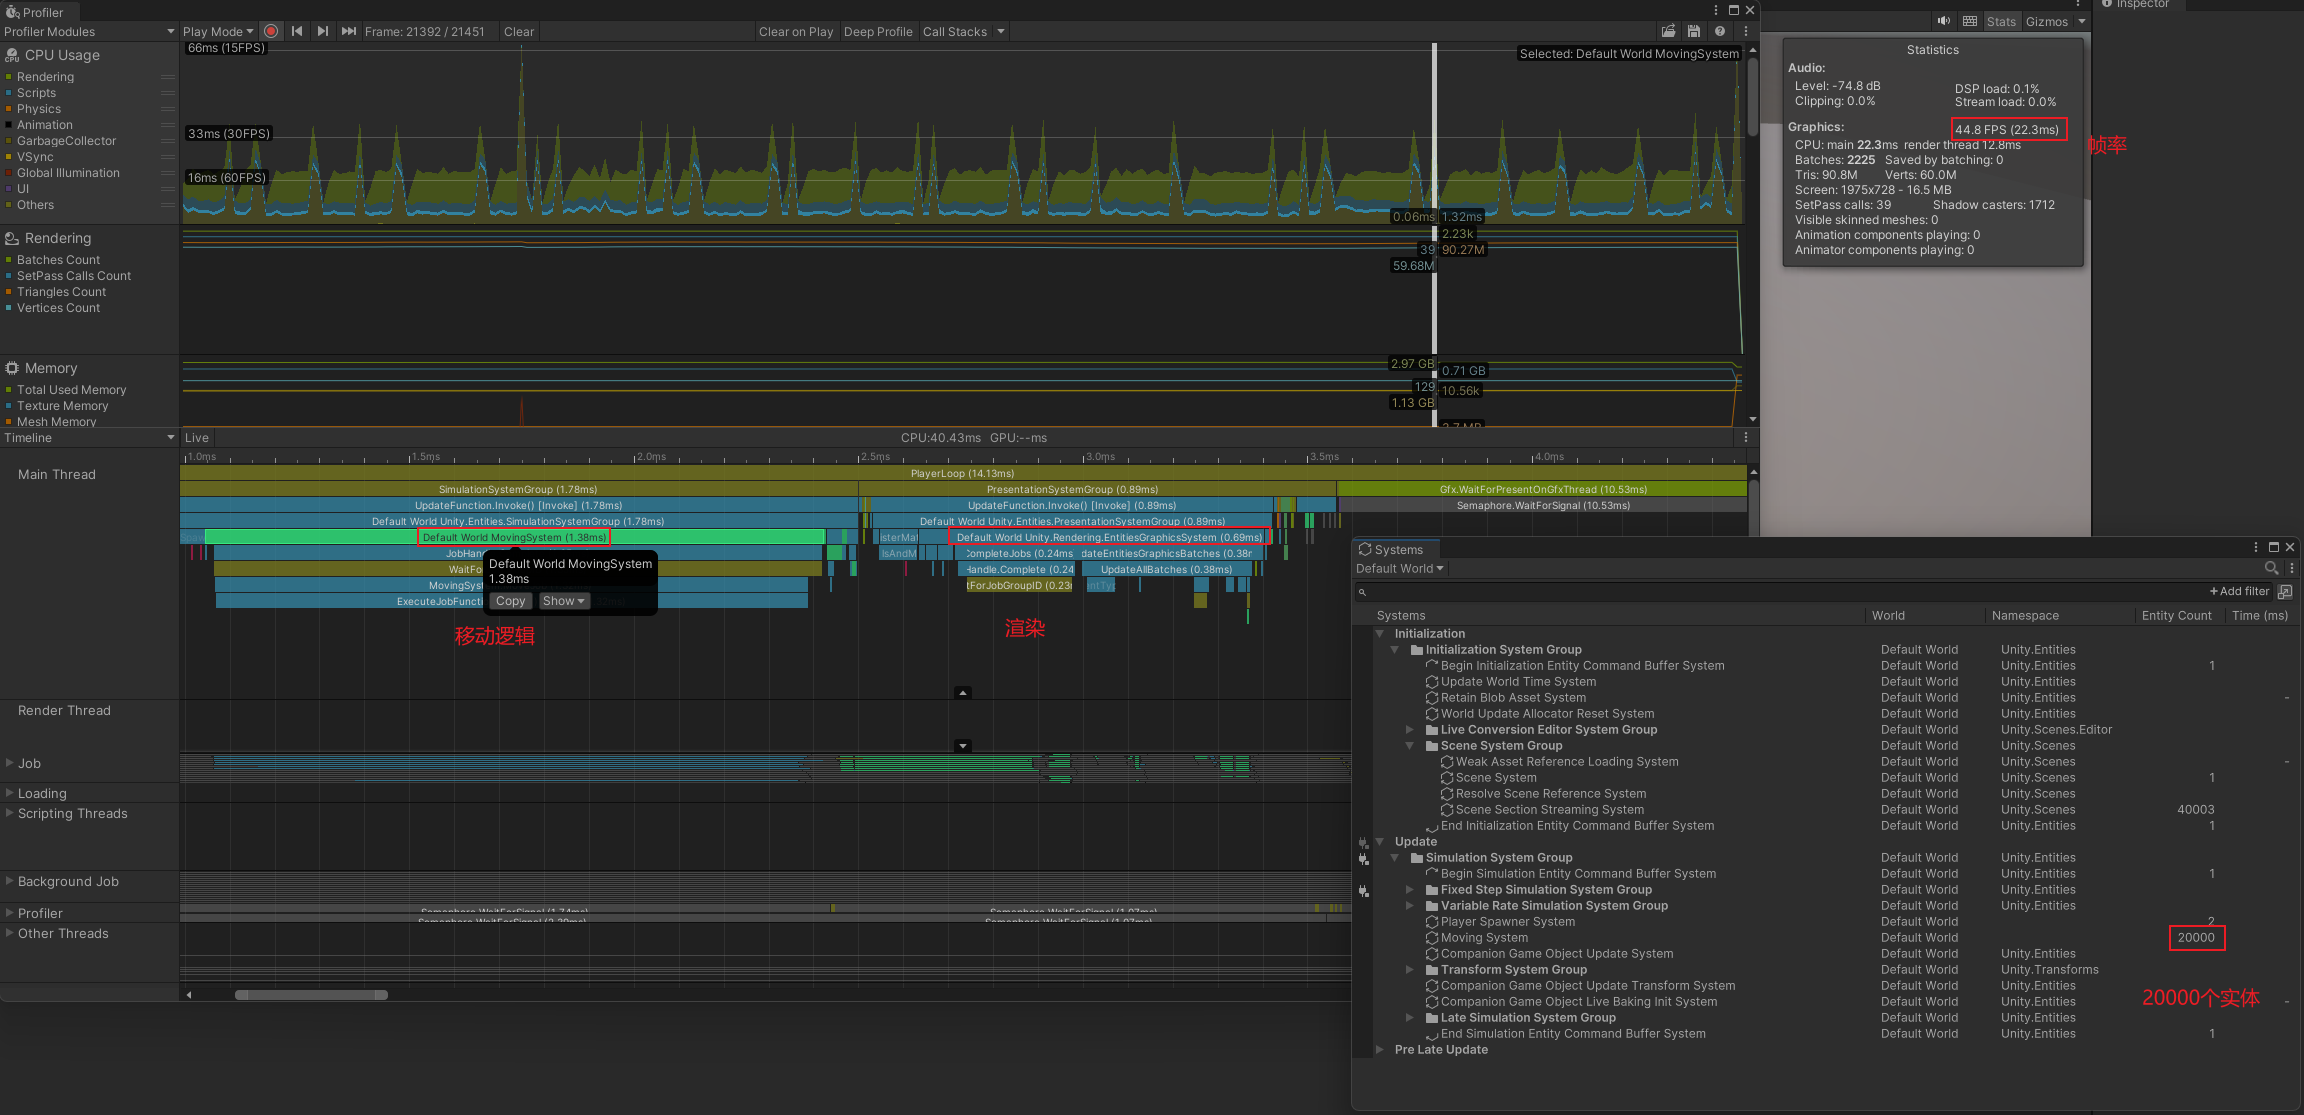
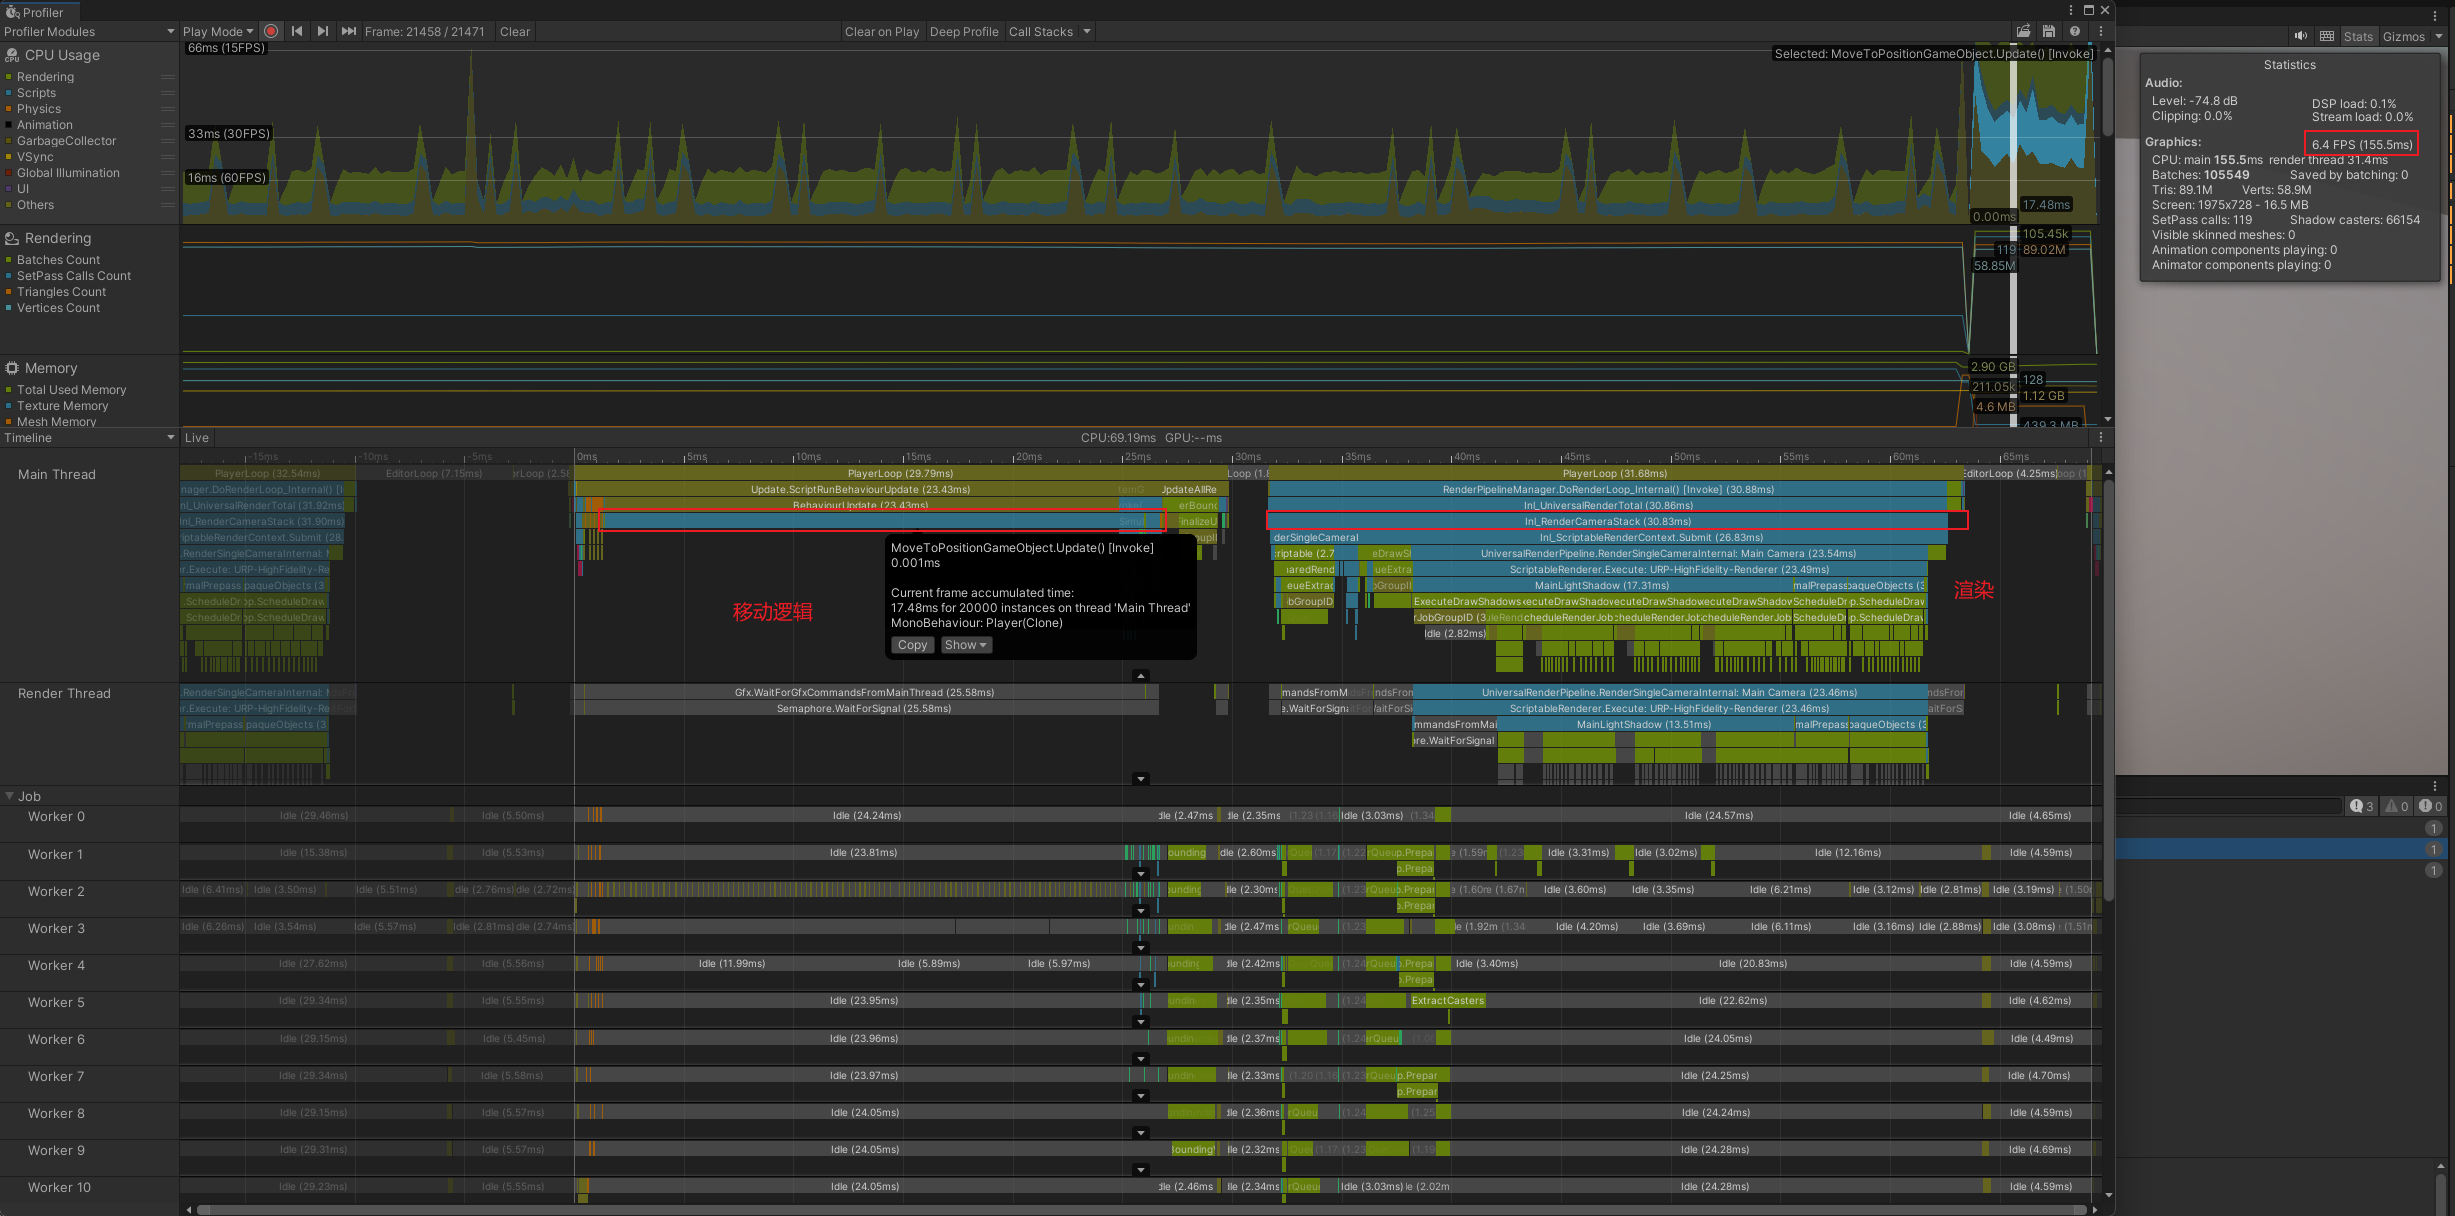
GameObject的Player生成与移动逻辑代码如下:
1 | public class PlayerSpawnerGameObject : MonoBehaviour |
1 | public class MoveToPositionGameObject : MonoBehaviour |
总结
总得来说,搞清楚工作流程之后还是挺简单的,但以上演示是最简单的操作方式,还需要继续学习。
- 比如可以使用
[UpdateInGroup(typeof(InitializationSystemGroup), OrderLast = true)]属性修饰System控制生命周期 - System中还有诸如
OnCreate、OnStartRunning等抽象方法复写