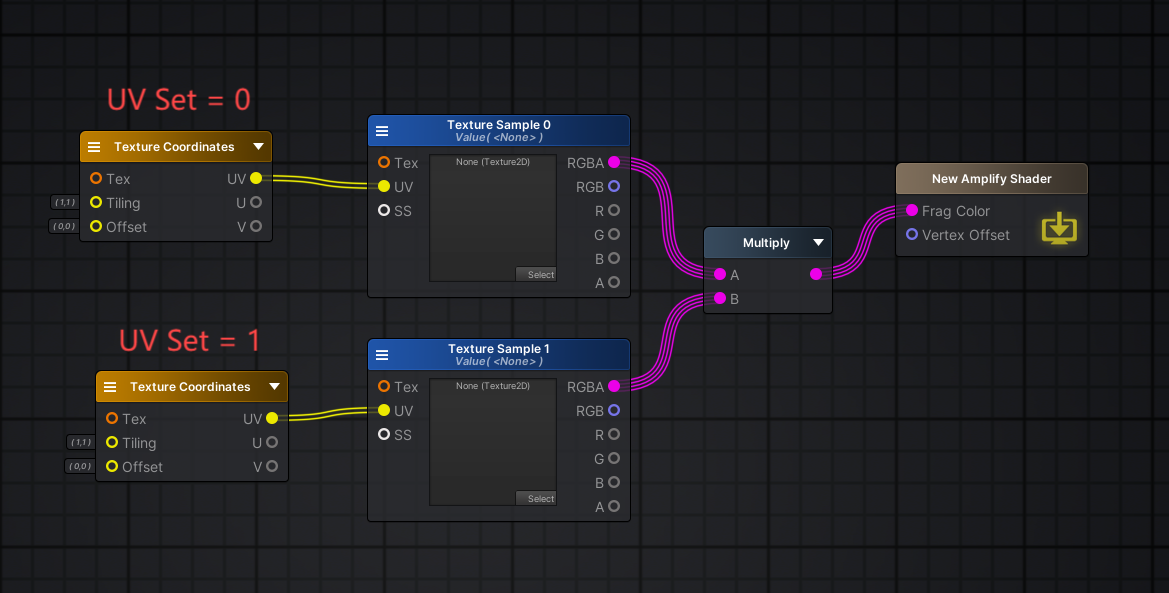
结构 结合图形编辑器认识代码,下面是使用ASE制作的一个很简单的两个纹理相乘的Shader
1
2
3
4
5
6
7
8
9
10
11
12
13
14
15
16
17
18
19
20
21
22
23
24
25
26
27
28
29
30
31
32
33
34
35
36
37
38
39
40
41
42
43
44
45
46
47
48
49
50
51
52
53
54
55
56
57
58
59
60
61
62
63
64
65
66
67
68
69
70
71
72
73
74
75
76
77
78
79
80
81
82
83
84
85
86
87
88
89
90
91
92
93
94
95
96
97
Shader "New Amplify Shader" { Properties { _TextureSample0("Texture Sample 0" , 2 D) = "white" {} _TextureSample1("Texture Sample 1" , 2 D) = "white" {} } SubShader { Tags { "RenderType" ="Opaque" } LOD 100 CGINCLUDE #pragma target 3.0 // 表示支持的着色器模型 ENDCG Blend Off AlphaToMask Off Cull Back ColorMask RGBA ZWrite On ZTest LEqual Offset 0 , 0 Pass { Name "Unlit" CGPROGRAM #pragma vertex vert // 指定顶点着色器函数是vert #pragma fragment frag // 指定片段(像素)着色器函数是frag #pragma multi_compile_instancing // 启用GPU实例化支持,用于优化同一对象的大量渲染 #include "UnityCG.cginc" // 包含 Unity 常用的 Cg 函数库,提供了常见的数学、纹理和其他实用函数 struct appdata { float4 vertex : POSITION; float4 color : COLOR; float4 ase_texcoord : TEXCOORD0; float4 ase_texcoord1 : TEXCOORD1; UNITY_VERTEX_INPUT_INSTANCE_ID }; struct v2f { float4 vertex : SV_POSITION; #ifdef ASE_NEEDS_FRAG_WORLD_POSITION float3 worldPos : TEXCOORD0; #endif float4 ase_texcoord1 : TEXCOORD1; UNITY_VERTEX_INPUT_INSTANCE_ID UNITY_VERTEX_OUTPUT_STEREO }; uniform sampler2D _TextureSample0; uniform sampler2D _TextureSample1; v2f vert ( appdata v ) { v2f o; UNITY_SETUP_INSTANCE_ID(v); UNITY_INITIALIZE_VERTEX_OUTPUT_STEREO(o); UNITY_TRANSFER_INSTANCE_ID(v, o); o.ase_texcoord1.xy = v.ase_texcoord.xy; o.ase_texcoord1.zw = v.ase_texcoord1.xy; float3 vertexValue = float3(0 , 0 , 0 ); vertexValue = vertexValue; v.vertex.xyz += vertexValue; o.vertex = UnityObjectToClipPos(v.vertex); return o; } fixed4 frag (v2f i ) : SV_Target { UNITY_SETUP_INSTANCE_ID(i); UNITY_SETUP_STEREO_EYE_INDEX_POST_VERTEX(i); fixed4 finalColor; float2 texCoord1 = i.ase_texcoord1.xy * float2( 1 ,1 ) + float2( 0 ,0 ); float2 texCoord3 = i.ase_texcoord1.zw * float2( 1 ,1 ) + float2( 0 ,0 ); finalColor = ( tex2D( _TextureSample0, texCoord1 ) * tex2D( _TextureSample1, texCoord3 ) ); return finalColor; } ENDCG } } CustomEditor "ASEMaterialInspector" Fallback Off }
Properties 1 2 3 4 5 Properties { _TextureSample0("Texture Sample 0" , 2 D) = "white" {} _TextureSample1("Texture Sample 1" , 2 D) = "white" {} }
定义了两个 2D 纹理,可以在Inspector上修改参数
SubShader 1 2 3 4 5 6 7 8 9 10 11 12 13 SubShader { Tags { "RenderType" ="Opaque" } LOD 100 ... Pass { Name "Unlit" CGPROGRAM ... ENDCG } }
每个 SubShader 可以有一个或多个渲染通道(Pass),表示渲染时应用不同的处理。这里使用了一个名字为 “Unlit” 的通道。
CGINCLUDE 和 渲染状态设置 1 2 3 4 5 6 7 8 9 10 CGINCLUDE #pragma target 3.0 // 表示支持的着色器模型 ENDCG Blend Off AlphaToMask Off Cull Back ColorMask RGBA ZWrite On ZTest LEqual Offset 0 , 0
Vertex 和 Fragment的定义 1 2 3 4 #pragma vertex vert // 指定顶点着色器函数是vert #pragma fragment frag // 指定片段(像素)着色器函数是frag #pragma multi_compile_instancing // 启用GPU实例化支持,用于优化同一对象的大量渲染 #include "UnityCG.cginc" // 包含 Unity 常用的 Cg 函数库,提供了常见的数学、纹理和其他实用函数
顶点着色器 (Vertex Shader) 1 2 3 4 5 6 7 8 struct appdata { float4 vertex : POSITION; float4 color : COLOR; float4 ase_texcoord : TEXCOORD0; float4 ase_texcoord1 : TEXCOORD1; UNITY_VERTEX_INPUT_INSTANCE_ID };
appdata 结构体代表顶点输入数据,它包含:
vertex : 顶点的空间坐标。color : 顶点颜色。ase_texcoord / ase_texcoord1 : 两个纹理坐标。UNITY_VERTEX_INPUT_INSTANCE_ID : 用于 GPU 实例化支持。
1 2 3 4 5 6 7 8 9 10 11 12 13 14 15 16 17 18 v2f vert (appdata v ) { v2f o; UNITY_SETUP_INSTANCE_ID(v); UNITY_INITIALIZE_VERTEX_OUTPUT_STEREO(o); UNITY_TRANSFER_INSTANCE_ID(v, o); o.ase_texcoord1.xy = v.ase_texcoord.xy; o.ase_texcoord1.zw = v.ase_texcoord1.xy; float3 vertexValue = float3(0 , 0 , 0 ); vertexValue = vertexValue; v.vertex.xyz += vertexValue; o.vertex = UnityObjectToClipPos(v.vertex); return o; }
片段着色器 (Fragment Shader) 1 2 3 4 5 6 7 struct v2f { float4 vertex : SV_POSITION; float4 ase_texcoord1 : TEXCOORD1; UNITY_VERTEX_INPUT_INSTANCE_ID UNITY_VERTEX_OUTPUT_STEREO };
SV_POSITION :表示该值是顶点的最终位置,经过模型-视图-投影矩阵变换后,在屏幕坐标系中的位置。TEXCOORD1 :表示这是该顶点对应的第二组纹理坐标。UNITY_VERTEX_INPUT_INSTANCE_ID:支持实例化渲染,如果你在场景中绘制多个相同的对象(实例化渲染),这个宏会确保每个实例都有唯一的标识符,使得每个对象在渲染时可以被区分开。UNITY_VERTEX_OUTPUT_STEREO:用于支持虚拟现实(VR)渲染,它确保在 VR 渲染中,输出适应双眼视图(左右眼分别渲染),从而生成立体图像。
1 2 3 4 5 6 7 8 9 10 11 12 fixed4 frag (v2f i ) : SV_Target { fixed4 finalColor; float2 texCoord1 = i.ase_texcoord1.xy * float2( 1 ,1 ) + float2( 0 ,0 ); float2 texCoord3 = i.ase_texcoord1.zw * float2( 1 ,1 ) + float2( 0 ,0 ); finalColor = ( tex2D( _TextureSample0, texCoord1 ) * tex2D( _TextureSample1, texCoord3 ) ); return finalColor; }
texCoord1 和 texCoord3:分别使用 ase_texcoord1 的前两项(xy)和后两项(zw)来获取两个纹理的纹理坐标。
tex2D(_TextureSample0, texCoord1):根据纹理坐标 texCoord1 从纹理 _TextureSample0 中取出颜色值。
tex2D(_TextureSample1, texCoord3):根据纹理坐标 texCoord3 从纹理 _TextureSample1 中取出颜色值。
finalColor = tex2D( _TextureSample0, texCoord1 ) * tex2D( _TextureSample1, texCoord3 ):将两个纹理的颜色值相乘,生成最终的颜色。
最终返回 finalColor,作为当前像素的颜色值。
源码 1 2 3 4 5 6 7 8 9 10 11 12 13 14 15 16 17 18 19 20 21 22 23 24 25 26 27 28 29 30 31 32 33 34 35 36 37 38 39 40 41 42 43 44 45 46 47 48 49 50 51 52 53 54 55 56 57 58 59 60 61 62 63 64 65 66 67 68 69 70 71 72 73 74 75 76 77 78 79 80 81 82 83 84 85 86 87 88 89 90 91 92 93 94 95 96 97 98 99 100 101 102 103 104 105 106 107 108 109 110 111 112 113 114 115 116 117 118 119 120 121 122 123 124 125 126 127 128 129 130 131 132 133 134 135 136 137 Shader "New Amplify Shader" { Properties { _TextureSample0("Texture Sample 0" , 2 D) = "white" {} _TextureSample1("Texture Sample 1" , 2 D) = "white" {} } SubShader { Tags { "RenderType" ="Opaque" } LOD 100 CGINCLUDE #pragma target 3.0 ENDCG Blend Off AlphaToMask Off Cull Back ColorMask RGBA ZWrite On ZTest LEqual Offset 0 , 0 Pass { Name "Unlit" CGPROGRAM #ifndef UNITY_SETUP_STEREO_EYE_INDEX_POST_VERTEX #define UNITY_SETUP_STEREO_EYE_INDEX_POST_VERTEX(input) #endif #pragma vertex vert #pragma fragment frag #pragma multi_compile_instancing #include "UnityCG.cginc" struct appdata { float4 vertex : POSITION; float4 color : COLOR; float4 ase_texcoord : TEXCOORD0; float4 ase_texcoord1 : TEXCOORD1; UNITY_VERTEX_INPUT_INSTANCE_ID }; struct v2f { float4 vertex : SV_POSITION; #ifdef ASE_NEEDS_FRAG_WORLD_POSITION float3 worldPos : TEXCOORD0; #endif float4 ase_texcoord1 : TEXCOORD1; UNITY_VERTEX_INPUT_INSTANCE_ID UNITY_VERTEX_OUTPUT_STEREO }; uniform sampler2D _TextureSample0; uniform sampler2D _TextureSample1; v2f vert ( appdata v ) { v2f o; UNITY_SETUP_INSTANCE_ID(v); UNITY_INITIALIZE_VERTEX_OUTPUT_STEREO(o); UNITY_TRANSFER_INSTANCE_ID(v, o); o.ase_texcoord1.xy = v.ase_texcoord.xy; o.ase_texcoord1.zw = v.ase_texcoord1.xy; float3 vertexValue = float3(0 , 0 , 0 ); #if ASE_ABSOLUTE_VERTEX_POS vertexValue = v.vertex.xyz; #endif vertexValue = vertexValue; #if ASE_ABSOLUTE_VERTEX_POS v.vertex.xyz = vertexValue; #else v.vertex.xyz += vertexValue; #endif o.vertex = UnityObjectToClipPos(v.vertex); #ifdef ASE_NEEDS_FRAG_WORLD_POSITION o.worldPos = mul(unity_ObjectToWorld, v.vertex).xyz; #endif return o; } fixed4 frag (v2f i ) : SV_Target { UNITY_SETUP_INSTANCE_ID(i); UNITY_SETUP_STEREO_EYE_INDEX_POST_VERTEX(i); fixed4 finalColor; #ifdef ASE_NEEDS_FRAG_WORLD_POSITION float3 WorldPosition = i.worldPos; #endif float2 texCoord1 = i.ase_texcoord1.xy * float2( 1 ,1 ) + float2( 0 ,0 ); float2 texCoord3 = i.ase_texcoord1.zw * float2( 1 ,1 ) + float2( 0 ,0 ); finalColor = ( tex2D( _TextureSample0, texCoord1 ) * tex2D( _TextureSample1, texCoord3 ) ); return finalColor; } ENDCG } } CustomEditor "ASEMaterialInspector" Fallback Off }